About SmartFix Template
- Template Version: 1.0.3
- Template Last Update: 25/10/2023
- Template Create Date: 13/02/2020
- Premium Support: Send Message
- Web Site: https://bluewindlab.net
- Developed By: bluewindlab
- Skype: bluewindlab
If you like this theme please spare a minute to rate it. If you want any support, Please feel free to contact me via my profile page https://themeforest.net/user/xenioushk.
Template Overview:
SmartFix is a modern looking responsive HTML5 template which is specially designed & developed for Computer Repair Service Center in mind. It is perfectly functional and ideal for Computer Repair Service Center web sites . All elements those are required to build a unique and creative Computer Repair Service Center site, comes with in template package.
SmartFix built with Popular Bootstrap 4.1.X and SASS framework. So, you can easily create a professional Computer Repair Service Center web site with unlimited color combination.
SmartFix template works smoothly and super fast on your Computer, tablet and mobile devices and comes with eye catching pre made blocks and sections such as about us section, service section, event section, Team section, blog section, appointment form, testimonial box, counter section, animation boxes, contact form section and much more.
Undoubtedly, SmartFix will gives you the easiest and best experience while customizing the template for Computer Repair Service Center web site. Any issue regarding SmartFix template, we're here to assist you.
SmartFix Template Features:
- Two Unique Home Page Layout.
- 15+ Responsive Templates.
- Modern,Creative and Very Clean looking Design.
- Fully Responsive Template Build With Bootstrap 3 Framework.
- Gallery Page.
- Functional Contact Form.
- Functional Appointment Form.
- SCSS Files Included.
- Font Awesome Icon font.
- Google Fonts used.
- Custom 404 Page.
- Coming Soon Page.
- Developer Friendly and Well Commented Code.
- Extensive Documentation.
- Premium Support From Developer.
15+ SmartFix Pre Made Templates:
- Home Page 1 (index.html)
- Home Page 2 (home-2.html)
- Home Page 3 (home-3.html)
- Home Page RTL (home-rtl.html)
- About Us (about-us.html)
- Teams (team.html)
- Single Team (event-team.html)
- Appointment (appointment.html)
- Contact Us (contact.html)
- Blog (blog.html)
- Blog single(single.html)
- FAQ (faq.html)
- Coming Soon (coming-soon.html)
- 404 Page(404.html)
- Gallery 01(gallery-1.html)
- Gallery 01(gallery-2.html)
- Element Highlights (element-highlights.html)
- Element Counter (element-counters.html)
- Element CTA (element-cta.html)
- Element Sponsors/Logos (element-logos.html)
- Element Testimonials (element-testimonial.html)
- Element Newsletter (element-newsletter.html)
HTML File & Elements Structure
All the directories and files are well organized as it shown on the image bellow. Same file tree has been applicable for all HTML files-
<!DOCTYPE html>
<!--[if IE 8]> <html lang="en" class="ie8"> <![endif]-->
<!--[if !IE]><!--> <html lang="en"> <!--<![endif]-->

<head>
    <meta charset="utf-8">
    <title>SmartFix - Computer Repair Service HTML5 Template</title>
    <meta name="viewport" content="width=device-width, initial-scale=1, maximum-scale=1">
    <meta name="description" content="SmartFix - Computer Repair Service HTML5 Template">
    <meta name="author" content="xenioushk">
    <link rel="shortcut icon" href="images/favicon.png">

    <!-- HTML5 shim, for IE6-8 support of HTML5 elements -->
    <!--[if lt IE 9]>
      <script src="https://html5shim.googlecode.com/svn/trunk/html5.js"></script>
    <![endif]-->

    <!-- The styles -->

    <link href="css/bootstrap.min.css" rel="stylesheet" type="text/css">
    <link href="css/font-awesome.min.css" rel="stylesheet" type="text/css">
    <link href="css/v4-shims.min.css" rel="stylesheet" type="text/css">
    <link href="css/owl.carousel.css" rel="stylesheet" type="text/css">
    <link href="css/owl.theme.css" rel="stylesheet" type="text/css">
    <link href="css/animate.css" rel="stylesheet" type="text/css">
    <link href="css/venobox.css" rel="stylesheet" type="text/css">
    <link rel="stylesheet" href="css/styles.css" type="text/css">
</head>

<body>

    <div id="preloader">
        <span class="margin-bottom"><img src="images/loader.gif" alt="Loading......"></span>
    </div>
This template is a mobile friendly (responsive) layout which is designed based on Bootstrap v4.4.1. See our HTML file structure which is in index.html. All the contents should set inside the container div.
<div class="container">

    <div class="row wow fadeInUp">

        <div class="col-lg-3 col-md-3 col-sm-6 col-xs-12">
            <div class="counter-block">
                <span class="counter">3321</span>
                <i class="flaticon-hospital icon"></i>
                <h4>BEDS HOSPITAL</h4>
            </div>
        </div> <!--  end .col-lg-3 col-md-3 col-sm-6 col-xs-12 -->

        <div class="col-lg-3 col-md-3 col-sm-6 col-xs-12">
            <div class="counter-block">
                <span class="counter">2519</span>
                <i class="flaticon-medical icon"></i>
                <h4>THERAPY EXPERTS</h4>
            </div>
        </div>  <!--  end .col-lg-3 col-md-3 col-sm-6 col-xs-12 -->

        <div class="col-lg-3 col-md-3 col-sm-6 col-xs-12">
            <div class="counter-block">
                <span class="counter">6325</span>
                <i class="flaticon-people icon"></i>
                <h4>HAPPY PATIENTS</h4>
            </div>
        </div> <!--  end .col-lg-3 col-md-3 col-sm-6 col-xs-12 -->

        <div class="col-lg-3 col-md-3 col-sm-6 col-xs-12">
            <div class="counter-block">
                <span class="counter">1500</span>
                <i class="flaticon-trophy icon"></i>
                <h4>NATIONAL AWARDS</h4>
            </div>
        </div> <!--  end .col-lg-3 col-md-3 col-sm-6 col-xs-12 -->

    </div> <!--  end .row -->

</div> <!--  end .container  -->
CSS File Structure
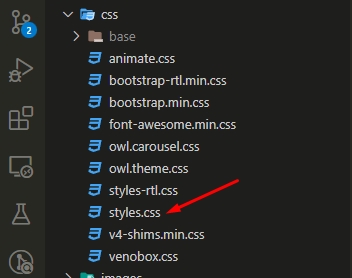
We are using 7 CSS files in this template and we separated styles for improving convenience to edit this template. If you're going to use this template in production, we recommend you to merge all stylesheets into one file (for decreasing HTTP queries).
<link rel="stylesheet" href="css/bootstrap.min.css">
<link href="css/font-awesome.min.css" rel="stylesheet" type="text/css" >
<link href="css/v4-shims.min.css" rel="stylesheet" type="text/css" >
<link href="css/animate.css" rel="stylesheet" type="text/css" >
<link href="css/owl.carousel.css" rel="stylesheet" type="text/css" >
<link href="css/venobox.css" rel="stylesheet" type="text/css" >
<link rel="stylesheet" href="css/styles.css">
Compile SCSS File:
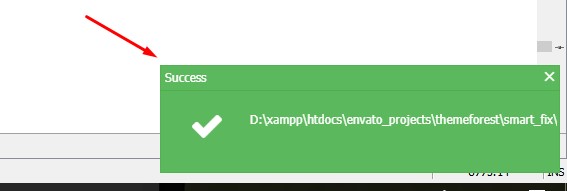
This template built with SCSS. You will find all the .scss files inside the src folder.
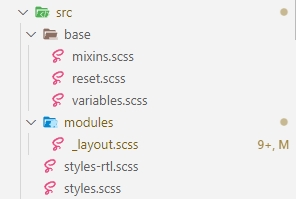
- To update the colors, fonts navigate to the src/base/variables.scss file.
- To update the template layouts, navigate to the src/modules/_layout.scss file.
- To update the template layouts for RTL, navigate to the src/styles-rtl.scss file.
- Warning: Please do not update/remove any codes inside the mixins.scss and reset.scss files.
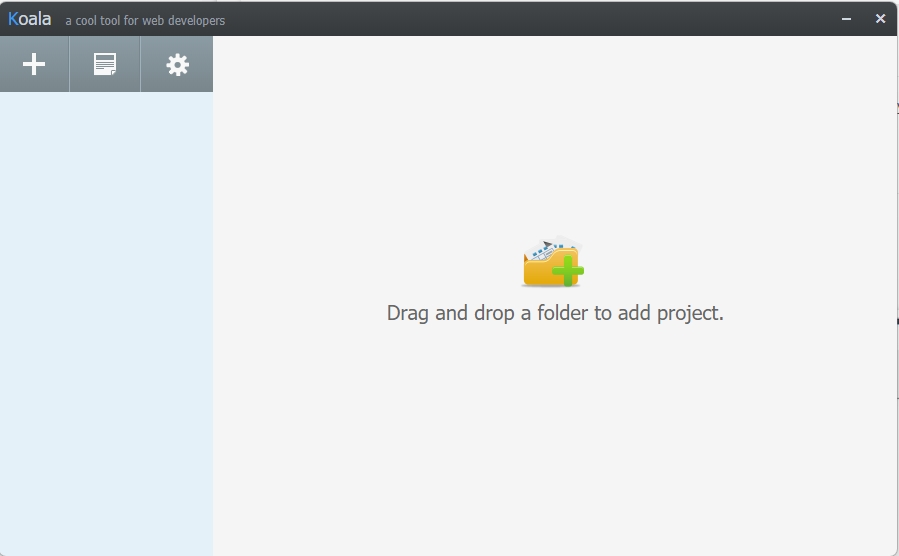
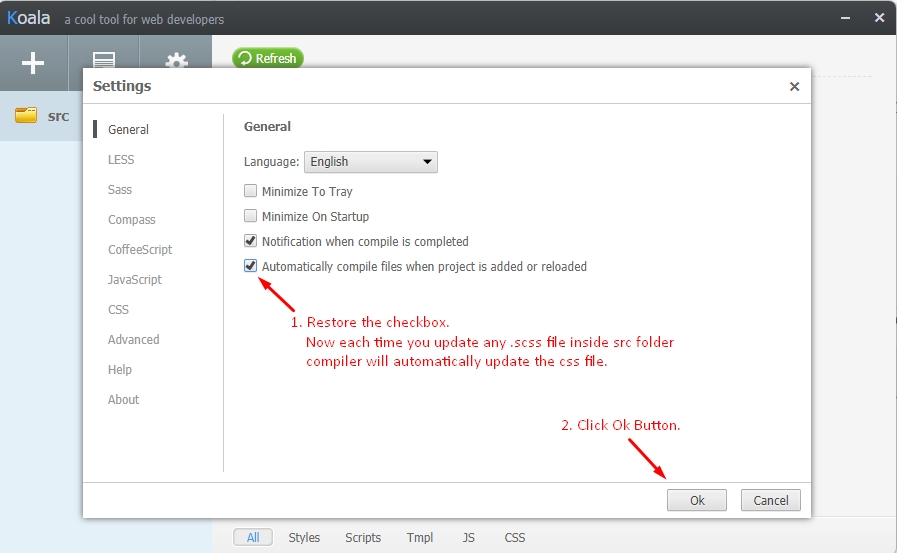
Using KOALA SCSS Compiler:
We have used KOALA scss compiler to generate CSS from scss file. It is FREE application for Windows, Mac, and Linux OS. You can download and install it from here.
Steps To Compile Less File Using KOALA:
Please follow the steps to compile template SCSS file.
-
Step 01: Open the Koala application.
-
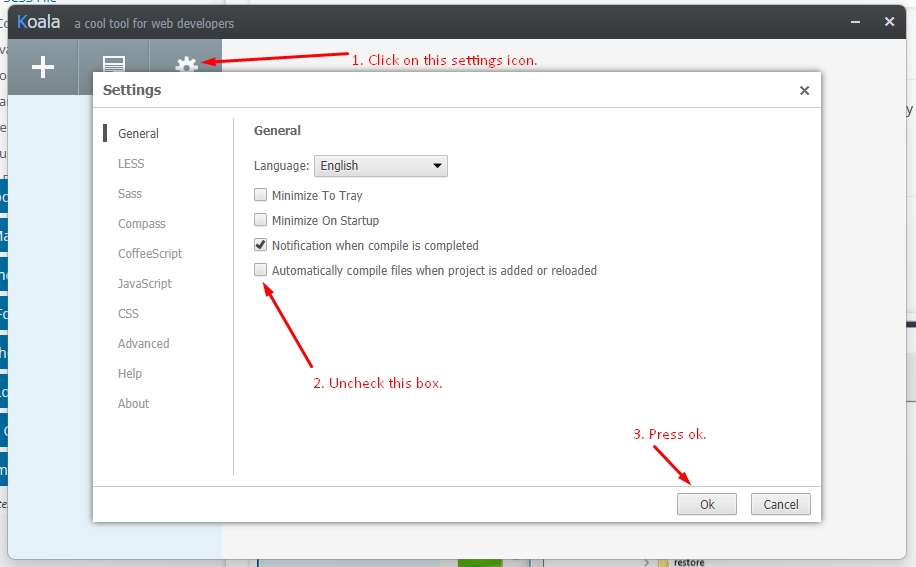
Step 02: Click on the settings icon. From the General tab, uncheck the "Automatically ..... reloaded" checkbox. Finally, click the Ok button.
-
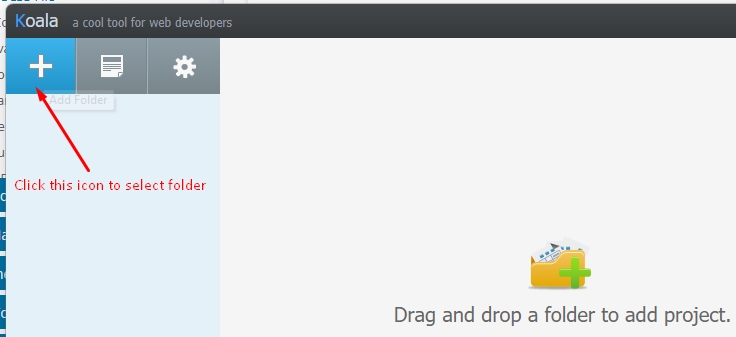
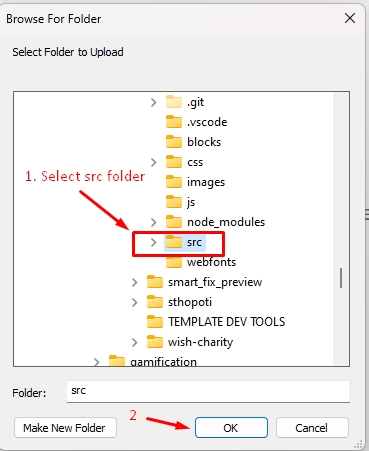
Step 03: Click the + icon to add the SCSS source folder.
-
Step 04: From your computer, choose the "src" folder.
-
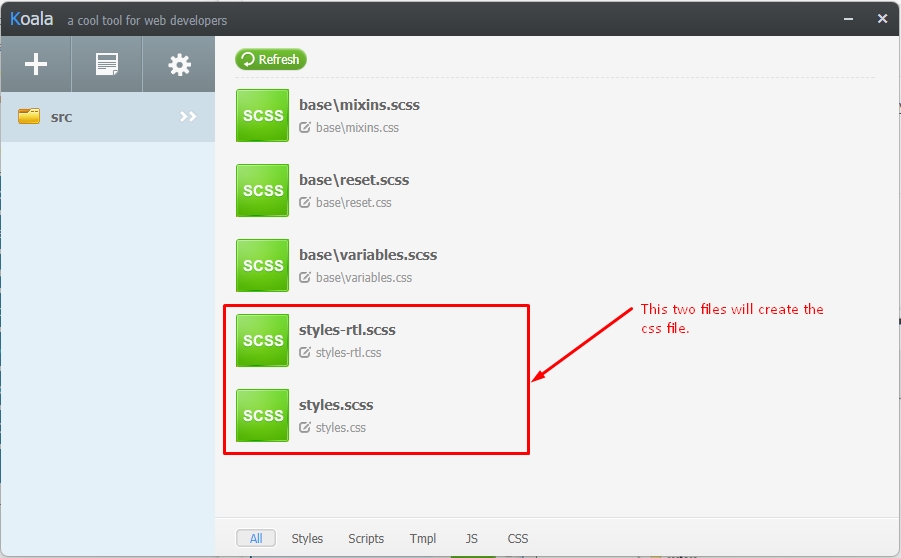
Step 05: The "styles.scss" and "styles-rtl.scss" files will generate the output css file.
-
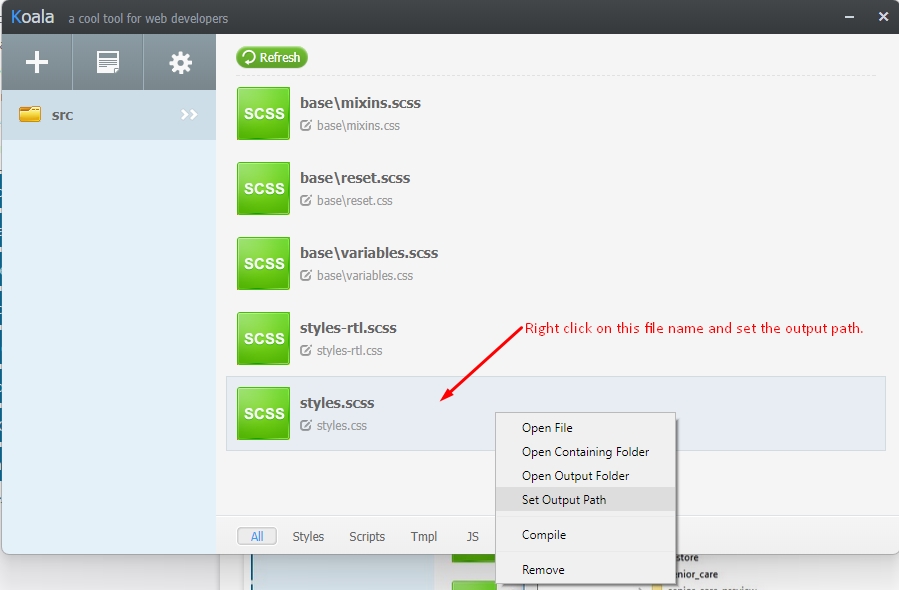
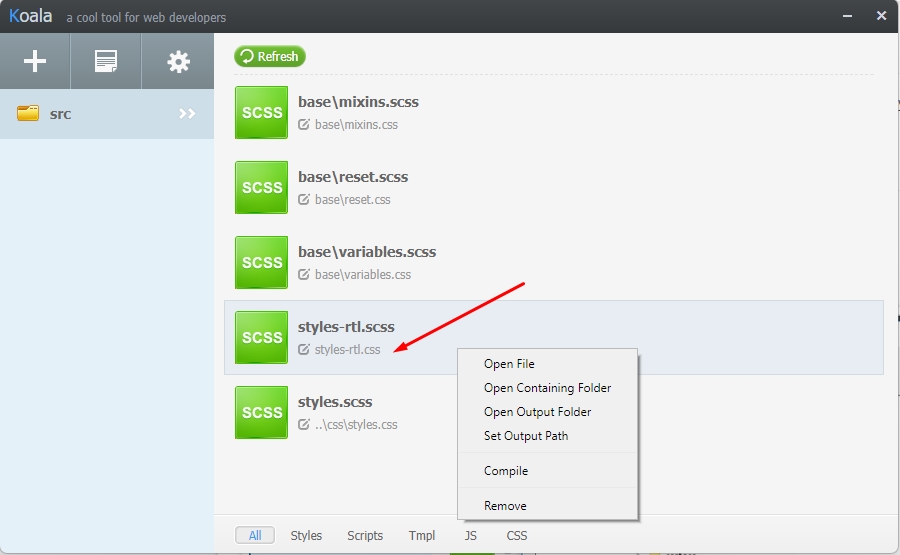
Step 06: Next, we need to set the output path of SCSS file. Right-click on the "styles.scss" file name and click on the "Set Output Path".
-
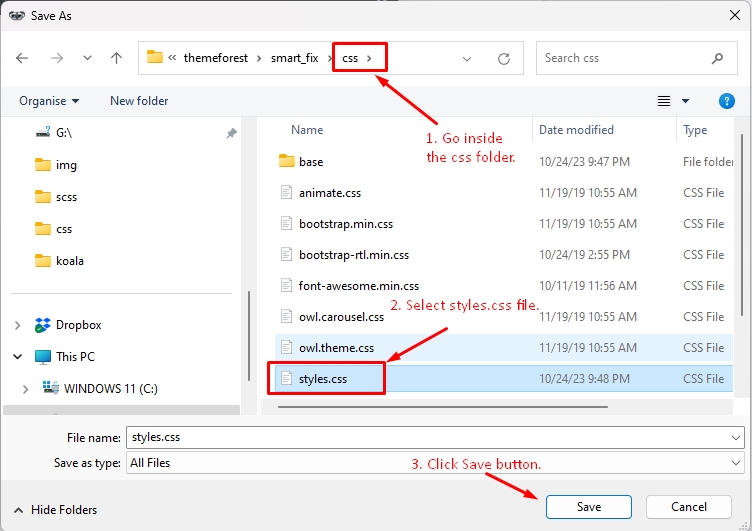
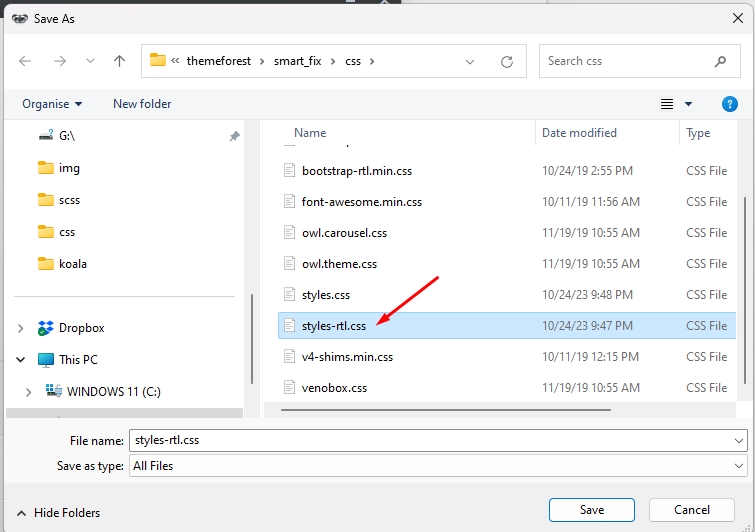
Step 07: Navigate to the css directory and click on the styles.css file. Finally, click on the "Save" button.
-
Step 08: Now, you will see that output file path has been changed.
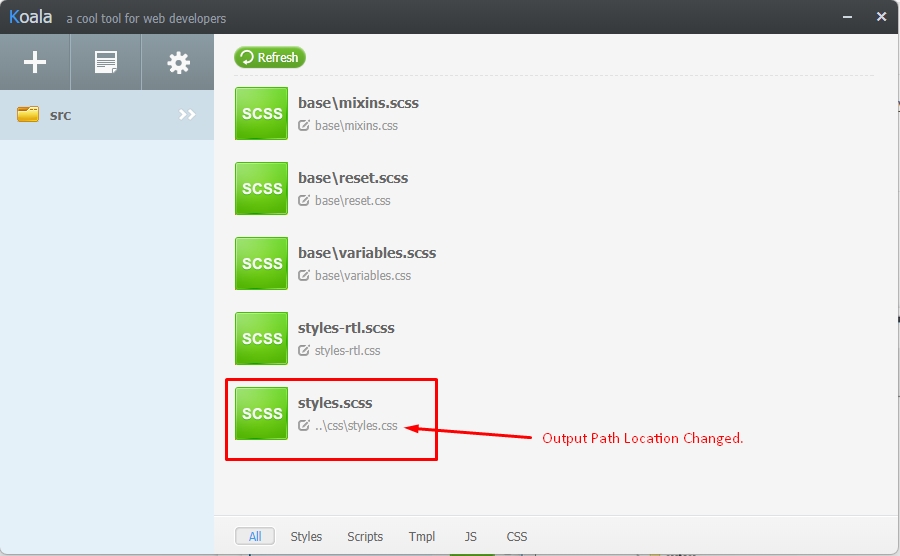
-
Step 09: Repeat the same steps for styles-rtl.scss file.
-
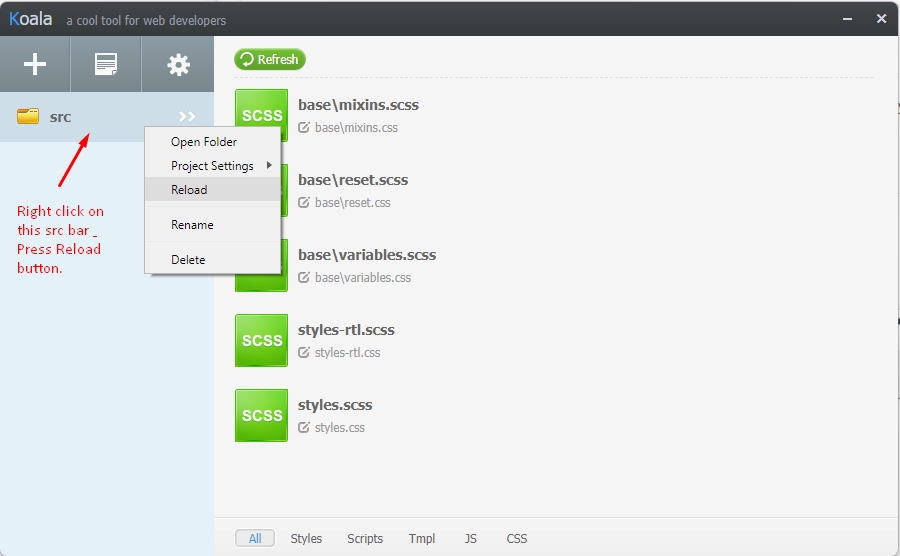
Step 10: Next, click on the src tab and select Reload from there. It will refresh all the changes.
-
Step 11: All done. Now, if you want to automatic reload option, restore the following settings.
Using NPM SCSS Compiler:
This method is more developer friendly. You need to download and install node and npm to generate CSS from SCSS file. You can download it from here.
-
Step 01:Open the project on Visual Studio Code Editor. Press "Ctrl+J" to open the terminal window and un the following command.

-
Step 02:Run the following command to compile the SCSS file.. It will create a new node_modules folder.

-
Step 03:Navigate to edit src/base/variables.scss file and edit font family, primary color, and other options.

-
Step 04:Compiler will automatically compile "styles.scss" and generate "styles.css" file inside the css folder.
Setup JavaScript Files:
The Smart Fix template uses 12 JavaScript files. This files should include bottom of all the HTML code and finish before the </body> tag. You will get all the JavaScript files into the template js folder.
<script src="js/jquery.min.js"></script>
<script src="js/bootstrap.min.js"></script>
<script src="js/wow.min.js"></script>
<script src="js/jquery.backTop.min.js "></script>
<script src="js/waypoints.min.js"></script>
<script src="js/waypoints-sticky.min.js"></script>
<script src="js/owl.carousel.min.js"></script>
<script src="js/jquery.stellar.min.js"></script>
<script src="js/jquery.counterup.min.js"></script>
<script src="js/venobox.min.js"></script>
<script src="js/jquery.countdown.min.js"></script>
<script src="js/custom-scripts.js"></script>
Navigation Bar:
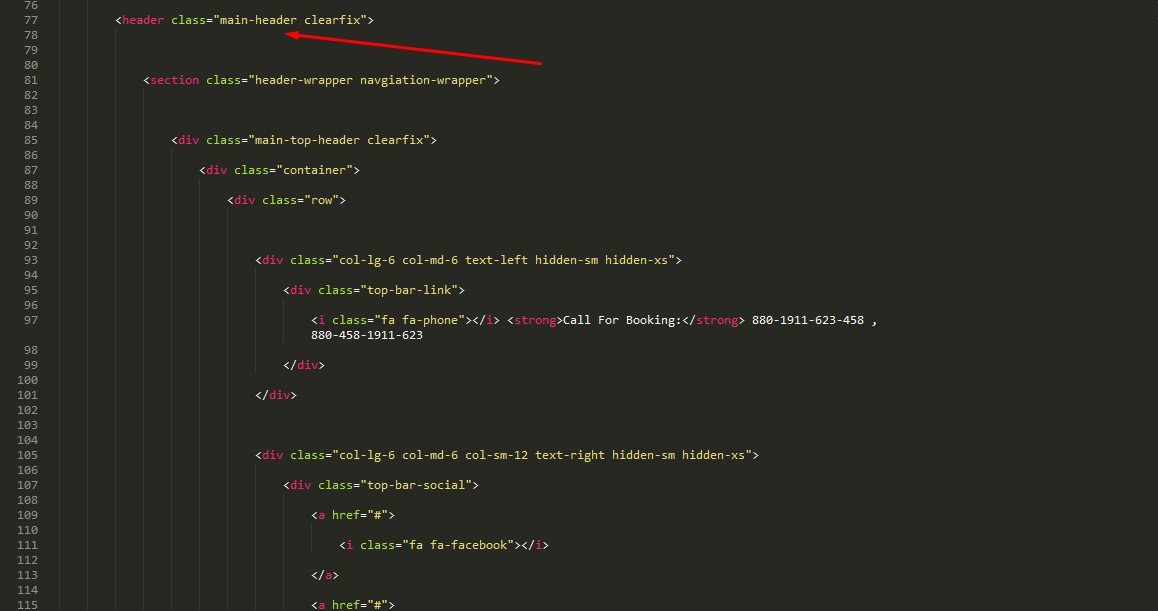
Top Navigation Bar Screen shot.
Enable Sticky Header:
To enable sticky header we just need to add sticky-header class after "main-header" class in "header" tag. Example-

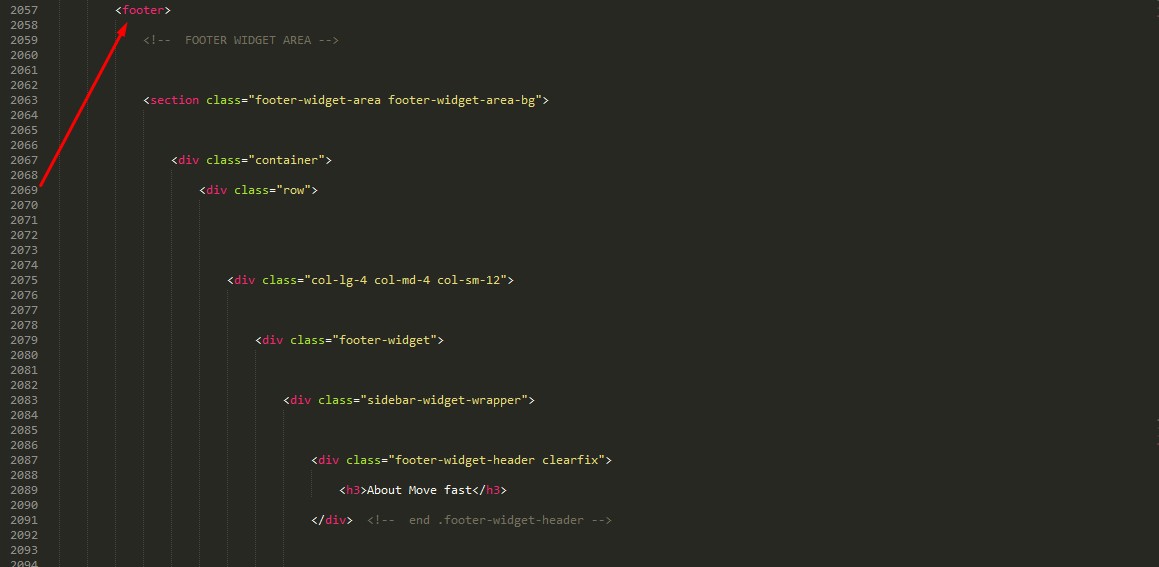
Footer Navigation Bar Screenshot:
Logo Change:
Header Logo Code:
You will get the following lines of code top of the index.html file. Recommended logo size is 250px X 60px.
<div class="col-md-4 col-sm-12 col-12 header-col-logo">
    <div class="header-logo logo">
        <a href="index.html">
            <img src="images/logo.png" alt="Logo">
        </a>
    </div><!-- end .logo  -->
</div><!-- end .col-md-3  -->
Template Font:
We have used Google font Montserrat for heading font and Poppins for body font. Font used in the top of the file scss/variables.scss
@import url("https://fonts.googleapis.com/css?family=Poppins:300,400,500,600,700&display=swap");Animation:
We used WOW plugin to trigger animations on scroll. Here are some animation classes we used in this Template. To learn more about WOW please read their Documentation
- fadeIn
- fadeInLeft
- fadeInRight
- fadeInUp
- fadeInDown
- fadeInLeftBig
- fadeInRightBig
- fadeInUpBig
- fadeInDownBig
Background Image:
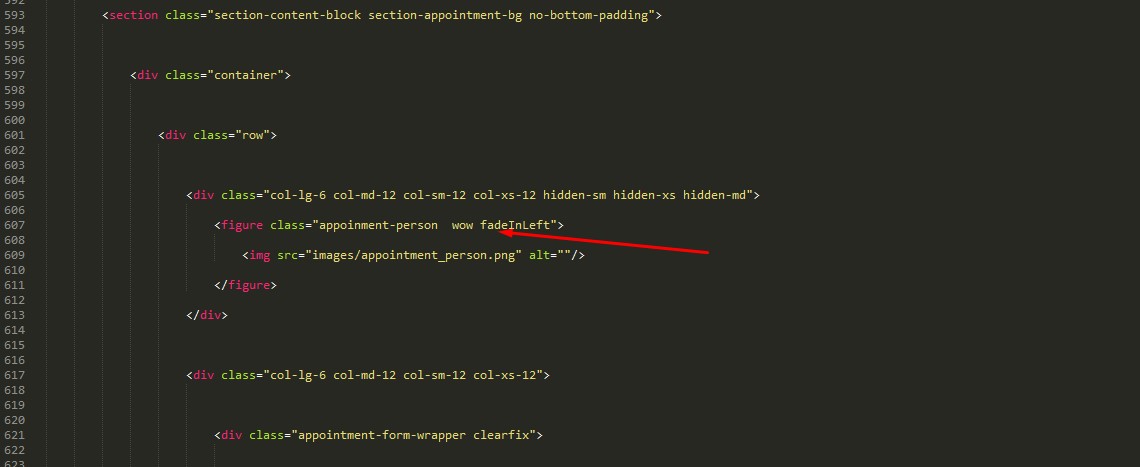
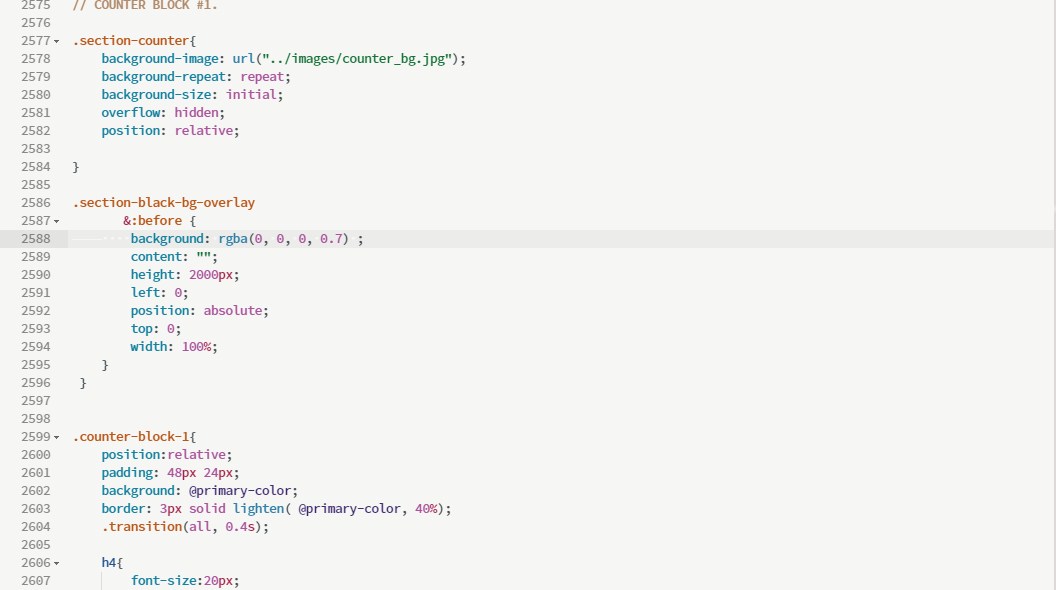
We used several background images in our template. You'll find the code in the file css/scss/layout.scss. These code will be available after the compilation of the layout.scss and written in the css/layout.css in the. Examples are given in the screenshot-
In the layout.scss
In the index.html
Remove Pre Load Icon:
Step 01:Open index.html or any other templates using an editor.
Step 02: You will get following lines of codes top of the template.
<div id="preloader">
  <span class="margin-bottom"><img src="images/loader.gif" alt=""></span>
</div>
Step 03:Remove those codes from template and save the file.
RTL Support
Step 01:Open index.html or any other templates using an editor.
Step 02: Top of the page you will html tag. Just replace that by the following lines of code.
<html lang="en" dir="rtl"> Step 03:Next, add the following two stylesheet inside head tag.
<link href="css/bootstrap-rtl.min.css" rel="stylesheet" type="text/css">
<link href="css/styles-rtl.css" rel="stylesheet" type="text/css">
Google Map
For any kind of business, Google Map is considered as an essential tool. To keep this requirement in mind, this template facilitates the option to display Google Map anywhere of the page. Check out step by step instructions to setup a Google Map -
Step 01: Open contact.html file and you'll get two JavaScript files has been included at the bottom of the page. Note that, you need to Set Google Map API Key in first JavaScript file. Otherwise, Google Map may not work properly.
<script src="https://maps.google.com/maps/api/js?sensor=true&key=AIzaSyB8asWf-NyxR0dTHf_OMY9iT_lRncQG8x3"></script>
<script src="js/jquery.gmap.min.js"></script>
Step 02: We have defined a div with an ID called 'map canvas' and we are going to show the map in there. You will get following example code in contact.html tempate.
<div class="section-google-map-block wow fadeInUp">
    <div id="map_canvas"></div>
</div>
Step 03: Next, navigate to the 'js/custom-scripts.js' folder in template directory. In that file, you can set Map Custom Height, location latitude and longitude. Generate your location "Latitude" and "Loongitude" from https://latlong.net/ & find more examples of Google Map in https://hpneo.github.io/gmaps/examples.html
// GOOGLE MAP FOR CONTACT US PAGE.
if ($('#map_canvas').length) {
    var map;
    $('#map_canvas').css({
        'height': '400px'
    });
    map = new GMaps({
        div: '#map_canvas',
        lat: -12.043333,
        lng: -77.028333
    });
    map.addMarker({
        lat: -12.043333,
        lng: -77.028333,
        title: 'Lima',
        click: function (e) {
            alert('You clicked in this marker');
        }
    });
}
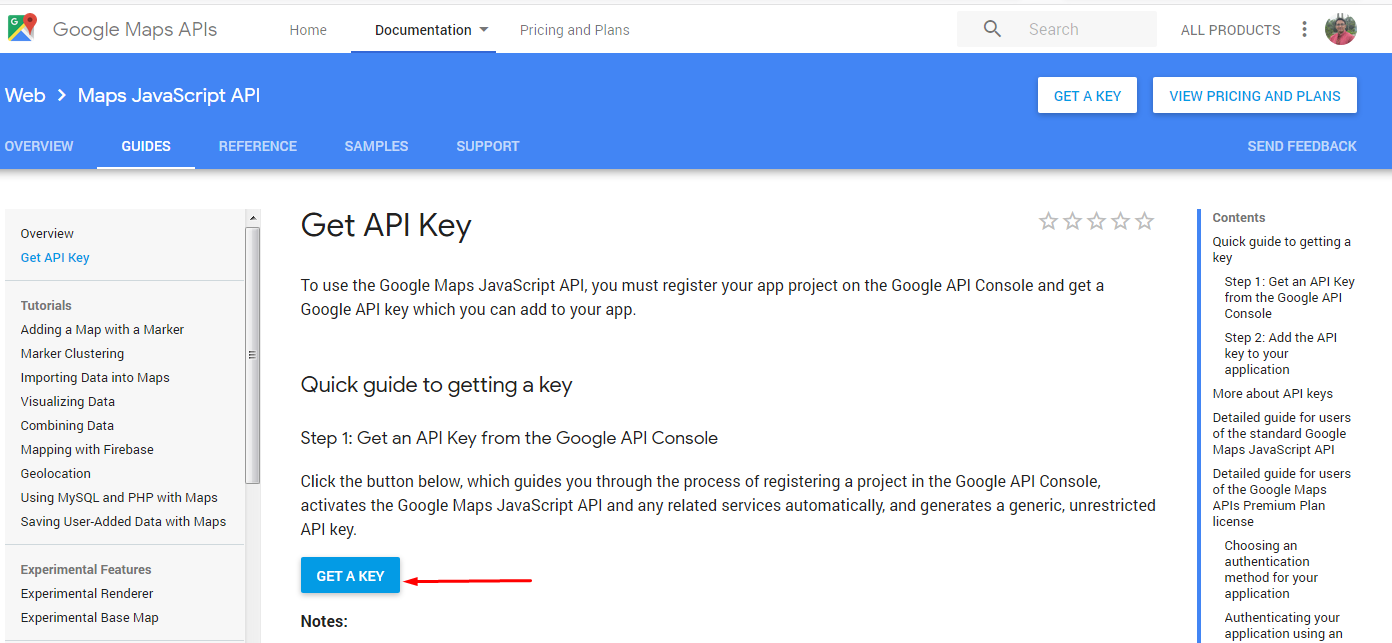
Setup Google Map API Key:
Step 01.
Go to following link and get your own API key.
https://developers.google.com/maps/documentation/javascript/get-api-key
Step 02. Click GET A KEY button and Popup window will appear.
Step 03. Now, follow the popup window instructions and you’ll get an API key like following example. Copy that API Key and add it in your JS code.
https://maps.google.com/maps/api/js?key=your-api-key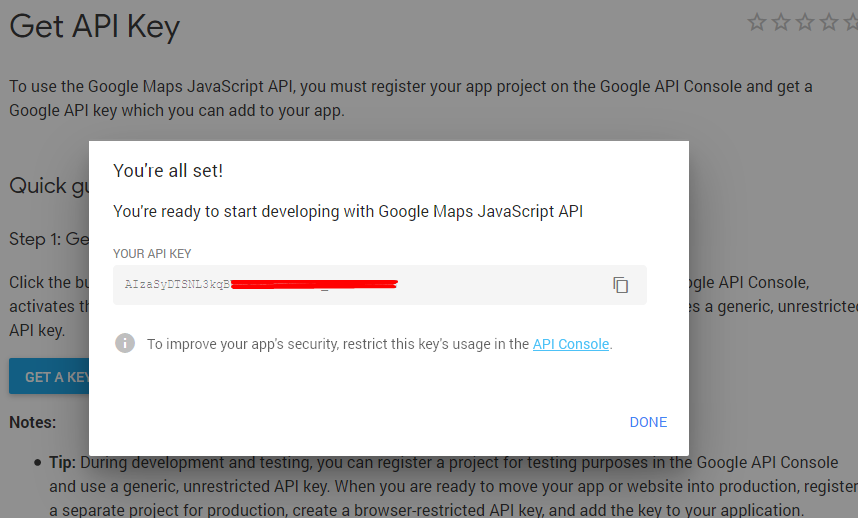
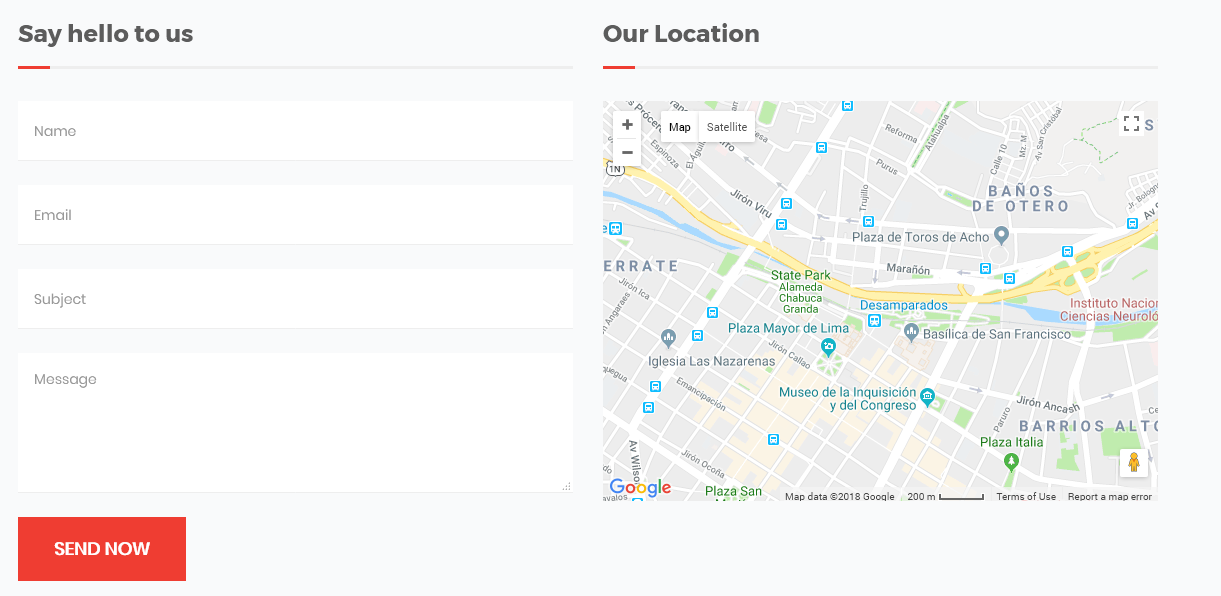
Output: If everything has been done perfectly, you will see a Google map displaying properly in your page like the following example.
Appointment Form
Without any question, Appointment Form is the most popular and well known communication medium between site owner and the customer. To be more specific, in terms of building a strong and solid customers base contact form can play a massive role. We believe that, it will helps you to achieve your business goal. To consider this fact, we have included a Fully functional, Responsive and Eye catching Appointment Form with template package, which validates the customer submitted information, processes it and send message instantly without reloading the page. Lets learn more about Appointment Form HTML, JavaScript and PHP Code.
Appointment Form HTML Code:
You can set custom text in 'placeholder' and 'data-msg' tags.
<div class="appointment-form-wrapper text-center clearfix">
    <h3 class="join-heading">Request Appointment</h3>
    <form class="appoinment-form" action="#" method="post">
        <div class="form-group col-md-6">
            <input id="user_name" name="user_name" class="form-control" placeholder="Name" type="text" data-msg="Username Required." required="required">
        </div>
        <div class="form-group col-md-6">
            <input id="user_email" name="user_email" class="form-control" placeholder="Email" type="email" data-msg="Email Address Required." required="required">
        </div>
        <div class="form-group col-md-6">
            <input id="user_phone" name="user_phone" class="form-control" placeholder="Phone" type="text" data-msg="Service Field Is Required." required="required">
        </div>
        <div class="form-group col-md-6">
            <div class="select-style">
                <select class="form-control" id="user_service" name="user_service">
                    <option value="" selected="selected">Select Services</option>
                    <option value="neck_pain">Neck Pain</option>
                    <option value="back_pain">Back Pain</option>
                </select>
            </div>
        </div>

        <div class="form-group col-md-6">
            <input id="appoinment_date" name="appoinment_date" class="form-control" placeholder="Date" type="email">
        </div>


        <div class="form-group col-md-6">
            <input id="appoinment_time" name="appoinment_time" class="form-control" placeholder="Time" type="email">
        </div>

        <div class="form-group col-md-12 col-sm-12 col-xs-12">
            <textarea id="user_message" name="user_message" class="form-control" rows="4" placeholder="Your Message..." data-msg="User Message Required" required="required"></textarea>
        </div>

        <div class="form-group col-md-12 col-sm-12 col-xs-12">
            <button id="btn_submit" name="btn_submit" class="btn-submit" type="submit">Get Appointment</button>
        </div>

    </form>

</div> <!-- end .appointment-form-wrapper  -->
Appointment Form JavaScript Code:
if($('.appoinment-form').length) {

        // Initialize all the fileds value.

        var $appt_form = $(".appoinment-form");
              $appt_form.find('input,textarea,select').val("");

        var emailRegex = /^[a-zA-Z0-9.!#$%&'*+\/=?^_`{|}~-]+@[a-zA-Z0-9](?:[a-zA-Z0-9-]{0,61}[a-zA-Z0-9])?(?:\.[a-zA-Z0-9](?:[a-zA-Z0-9-]{0,61}[a-zA-Z0-9])?)*$/,
              $appt_default_err_msg= "This field is required.",
              $error_border =  "border-bottom: 1px solid red;";

        $appt_form.find("button[type=submit]").on("click", function() {

            var appt_form_bValid,
              your_name_bValid,
              your_email_bValid,
              your_phone_bValid,
              your_service_type_bValid,
              textarea_message_bValid;

                var $this = $(this);
                var $this_appt_form = $this.closest('form'),
                    $your_name = $this_appt_form.find("#your_name"),
                    $your_email = $this_appt_form.find("#your_email"),
                    $your_phone = $this_appt_form.find("#your_phone"),
                    $your_service_type = $this_appt_form.find("#your_service_type"),
                    $textarea_message = $this_appt_form.find("#textarea_message");

            var $all_fields = $([]).add($your_name).add($your_email).add($your_phone).add($your_service_type).add($textarea_message);


                appt_form_bValid = true;


                // Name Validation.

                if( $your_name.val() === "" && $your_name.is('[required]') ) {

                    your_name_bValid = false;
                    $your_name.next("span").remove();
                    $your_name.attr("style", $error_border).after("" + $your_name.attr("data-msg") + "");

                } else {
                    your_name_bValid = true;
                    $your_name.removeAttr("style").next("span").remove();

                }

                 appt_form_bValid = appt_form_bValid && your_name_bValid;


               // Email Validation.

                if( $your_email.val() === ""  || email_checkRegexp( $your_email , emailRegex) == false  ) {

                    your_email_bValid = false;
                    $your_email.next("span").remove();
                    $your_email.attr("style", $error_border).after("" + $your_email.attr("data-msg") + "");

                } else {
                     your_email_bValid = true;
                    $your_email.removeAttr("style").next("span").remove();

                }

                appt_form_bValid = appt_form_bValid && your_email_bValid;

                // Phone No Validation.

                if( $your_phone.val() === "" && $your_phone.is('[required]') ) {

                    your_phone_bValid = false;
                    $your_phone.next("span").remove();
                    $your_phone.attr("style", $error_border).after("" + $your_phone.attr("data-msg") + "");

                } else {
                    your_phone_bValid = true;
                    $your_phone.removeAttr("style").next("span").remove();
                }

                appt_form_bValid = appt_form_bValid && your_phone_bValid;


                 // Your Service Validation.

                if( $your_service_type.val() === "" && $your_service_type.is('[required]') ) {

                    var your_service_type_error_msg = ( $your_service_type.attr("data-msg") == undefined ) ? $appt_default_err_msg : $your_service_type.data("msg");
                    your_service_type_bValid = false;
                    $your_service_type.next("span").remove();
                    $your_service_type.attr("style", $error_border).after("" + your_service_type_error_msg + "");

                } else {
                    your_service_type_bValid = true;
                    $your_service_type.removeAttr("style").next("span").remove();

                }

                 appt_form_bValid = appt_form_bValid && your_service_type_bValid;

                 // Move Size Validation.

                if( $textarea_message.val() === "" && $textarea_message.is('[required]') ) {

                    textarea_message_bValid = false;
                    $textarea_message.next("span").remove();
                    $textarea_message.attr("style", $error_border).after("" + $textarea_message.attr("data-msg") + "");

                } else {
                    textarea_message_bValid = true;
                    $textarea_message.removeAttr("style").next("span").remove();

                }

                 appt_form_bValid = appt_form_bValid && textarea_message_bValid;

                if ( appt_form_bValid === true ) {

                    $all_fields.attr("disabled", "disabled");
                    $this.after("Please wait ....").attr("disabled","disabled");

                    $.ajax({
                    url: "free_quote_email.php",
                    type: 'POST',
                    dataType: 'JSON',
                    data: {
                        safety_key: 'dynatf',
                        your_name: $your_name.val(),
                        your_email: $your_email.val(),
                        your_phone: $your_phone.val(),
                        your_service_type: $this_appt_form.find("#your_service_type option:selected").text(),
                        textarea_message: $textarea_message.val()
                    },
                    success: function (data) {
                        if ( data.status === 1) {

                            $this.next("span").remove();
                            $this.after("" + data.msg + "");

                            setTimeout(function(){

                                $all_fields.removeAttr("disabled").val("");

                                $this.next("span").slideUp('slow',function(){
                                    $(this).remove();
                                    $this.removeAttr("disabled");
                                });

                            },3000)
                        } else {

                            $all_fields.removeAttr("disabled");

                        }
                    },
                    error: function (xhr, textStatus, e) {
                        alert("Email can not be sent. Please try again.");
                        return;
                    }
                });


                }

            return false;

        })

}
Appointment Form PHP Code:
You will get following codes in 'free_quote_email.php' file. There, you just need to set Administrator user email address, who would like to receive the customer messages.
if (!isset($_REQUEST['safety_key'])) {

    die();
}

$to = "test.you@gmail.com"; // Set Admin email address in here.

$email_subject = "Customer Free Quote Request";

$customer_name = isset( $_POST['your_name'] ) ? $_POST['your_name'] : '';
$customer_email = isset( $_POST['your_email'] ) ? $_POST['your_email'] : '';
$customer_phone = isset( $_POST['your_phone'] ) ? $_POST['your_phone'] : '';
$your_service_type = isset( $_POST['your_service_type'] ) ? $_POST['your_service_type'] : '';
$customer_message = isset( $_POST['textarea_message'] ) ? $_POST['textarea_message'] : '';

$template = 'Hello Administrator, <br>'
        . '<br>A customer has been submitted free quotation request. Here goes the details.<br>'
        . 'Name: ' . $customer_name . '<br>'
        . 'Email: ' . $customer_email . '<br>'
        . 'Phone No: ' . $customer_phone . '<br>'
        . 'Service: ' . $your_service_type . '<br>'
        . 'Message: ' . $customer_message;
$message = "<div>" . $template . "</div>";

// Send A Confirmation Message To The Site Admin.

$headers = 'MIME-Version: 1.0' . "\r\n";
$headers.='Content-type: text/html; charset=utf-8; charset=iso-8859-1' . "\r\n";
$headers.='From: Free Quote Request <' . $customer_email . '>';
mail( $to, $email_subject, $message, $headers, '');


// Send A Confirmation Message To Customer.

$customer_email_subject = "Free Quote Confirmation";

$template = 'Hello ' . $customer_name . ',<br>'
            . '<br>Thanks for submitting free quote request. One of our customer support representative will contact you very soon. <br>Regards.<br>';
$message = "<div>" . $template . "</div>";

$headers = 'MIME-Version: 1.0' . "\r\n";
$headers.='Content-type: text/html; charset=utf-8; charset=iso-8859-1' . "\r\n";
$headers.='From: Free Quote Confirmation <no-reply@yoursite.com>'; // Change Admin Reply Email In here.

mail( $customer_email, $customer_email_subject, $message, $headers, '');

$data = array(
    'status' => 1,
    'msg' => "Your Query has been received, We will contact you soon."
);

echo json_encode($data);
Contact Form
Without any question, Contact Form is the most popular and well known communication medium between site owner and the customer. To be more specific, in terms of building a strong and solid customers base contact form can play a massive role. We believe that, it will helps you to achieve your business goal. To consider this fact, we have included a Fully functional, Responsive and Eye catching Contact Form with template package, which validates the customer submitted information, processes it and send message instantly without reloading the page. Lets learn more about Contact Form HTML, JavaScript and PHP Code.
Contact Form HTML Code:
You can set custom text in 'placeholder' and 'data-msg' tags.
<div class="contact-form-block">

        <h2 class="contact-title">Say Hello To Us</h2>

        <form role="form" action="#" method="post" id="contact-form">

            <div class="form-group">
                <input type="text" class="form-control" id="user_name" name="user_name" placeholder="Name" data-msg="Please Write Your Name">
            </div>

            <div class="form-group">
                <input type="email" class="form-control" id="user_email" name="user_email" placeholder="Email" data-msg="Please Write Your Valid Email">
            </div>
            <div class="form-group">
                <input type="text" class="form-control" id="email_subject" name="email_subject" placeholder="Subject" data-msg="Please Write Your Message Subject">
            </div>

            <div class="form-group">
                <textarea class="form-control" rows="5" name="email_message" id="email_message" placeholder="Message" data-msg="Please Write Your Message" ></textarea>
            </div>

            <div class="form-group">
                <button type="submit" class="btn btn-theme">Send Now</button>
            </div>

        </form>

    </div>
Contact Form JavaScript Code:
if($('#contact-form').length) {

       var $contact_form = $("#contact-form");
       var $contact_submit_btn = $contact_form.find("button.btn-custom");
       var $user_name = $contact_form.find("#user_name");
       var $user_email = $contact_form.find("#user_email");
       var $email_subject = $contact_form.find("#email_subject");
       var $email_message = $contact_form.find("#email_message");

       var emailRegex = /^[a-zA-Z0-9.!#$%&'*+\/=?^_`{|}~-]+@[a-zA-Z0-9](?:[a-zA-Z0-9-]{0,61}[a-zA-Z0-9])?(?:\.[a-zA-Z0-9](?:[a-zA-Z0-9-]{0,61}[a-zA-Z0-9])?)*$/;

       var $all_fields = $([]).add($user_name).add($user_email).add($email_subject).add($email_message);

       $all_fields.val("");

       var $error_border =  "border-bottom: 1px solid red;";
       var contact_form_bValid, user_name_bValid,user_email_bValid,user_email_subject_bValid, user_email_message_bValid;

       $contact_form.find("button[type=submit]").on("click", function() {

               contact_form_bValid = true;

               if( $user_name.val() === "" ) {

                   user_name_bValid = false;
                   $user_name.next("span").remove();
                   $user_name.attr("style", $error_border).after("" + $user_name.attr("data-msg") + "");

               } else {
                   user_name_bValid = true;
                   $user_name.removeAttr("style").next("span").remove();

               }

                contact_form_bValid = contact_form_bValid && user_name_bValid;


               if( $user_email.val() === ""  || email_checkRegexp( $user_email , emailRegex) === false  ) {

                   user_email_bValid = false;
                   $user_email.next("span").remove();
                   $user_email.attr("style", $error_border).after("" + $user_email.attr("data-msg") + "");

               } else {
                    user_email_bValid = true;
                   $user_email.removeAttr("style").next("span").remove();

               }

               contact_form_bValid = contact_form_bValid && user_email_bValid;


               if( $email_subject.val() === "" ) {

                   user_email_subject_bValid = false;
                   $email_subject.next("span").remove();
                   $email_subject.attr("style", $error_border).after("" + $email_subject.attr("data-msg") + "");

               } else {
                   user_email_subject_bValid = true;
                   $email_subject.removeAttr("style").next("span").remove();
               }

               contact_form_bValid = contact_form_bValid && user_email_subject_bValid;

               if( $email_message.val() === "" ) {

                   user_email_message_bValid = false;
                   $email_message.next("span").remove();
                   $email_message.attr("style", $error_border).after("" + $email_message.attr("data-msg") + "");

               } else {
                   user_email_message_bValid = true;
                   $email_message.removeAttr("style").next("span").remove();

               }

               contact_form_bValid = contact_form_bValid && user_email_message_bValid;

               if ( contact_form_bValid === true ) {

                   $all_fields.attr("disabled", "disabled");
                   $contact_submit_btn.after("Please wait ....").attr("disabled","disabled");

                   $.ajax({
                   url: "contact_email.php",
                   type: 'POST',
                   dataType: 'JSON',
                   data: {
                       safety_key: 'dynatf',
                       user_name: $user_name.val(),
                       user_email: $user_email.val(),
                       email_subject: $email_subject.val(),
                       email_message: $email_message.val()
                   },
                   success: function (data) {

                       if ( data.status === 1) {

                           $contact_submit_btn.next("span").remove();
                           $contact_submit_btn.after("" + data.msg + "");

                           setTimeout(function(){

                               $all_fields.removeAttr("disabled").val("");

                               $contact_submit_btn.next("span").slideUp('slow',function(){
                                   $(this).remove();
                                   $contact_submit_btn.removeAttr("disabled");
                               });

                           },3000);

                       } else {

                           $all_fields.removeAttr("disabled");

                       }

                   },
                   error: function (xhr, textStatus, e) {
                       alert("Email can not be sent. Please try again.");
                       return;
                   }

               });

               }

           return false;

       })

   }
Contact Form PHP Code:
You will get following codes in 'contact_email.php' file. There, you just need to set Administrator user email address, who would like to receive the customer messages.
<?php

if (!isset($_REQUEST['safety_key'])) {
    die();
}

$to = "youremail@gmail.com"; // write you email address in here.

// Fetching Values from URL.

$user_name = $_POST['user_name'];

$user_email = $_POST['user_email'];

$email_subject = $_POST['email_subject'];

$email_message = $_POST['email_message'];

$template = '<div>Hello ' . $user_name . ',<br>'
        . '<br>Thank you...! For Contacting Us.<br><br>'
        . 'Name:' . $user_name . '<br>'
        . 'Email:' . $user_email . '<br>'
        . 'Message:' . $email_message . '<br><br>'
        . 'This is a Contact Confirmation mail.'
        . '<br>'
        . 'We Will contact You as soon as possible .</div>';

$message = "<div>" . $template . "</div>";

$headers = 'MIME-Version: 1.0' . "\r\n";

$headers.='Content-type: text/html; charset=utf-8; charset=iso-8859-1' . "\r\n";

$headers.='From:' . $user_email . "\r\n"; // Sender's Email

mail($to, $email_subject, $message, $headers, '');

$data = array(
    'status' => 1,
    'msg' => "Your Query has been received, We will contact you soon."
);

echo json_encode($data);
Support & Miscellaneous
SmartFix Template comes with six month premium support directly from the developer.
Troubleshooting
It's a HTML5 template. So, you can not use it in WordPress platform.
Change Log
2023, 25 October - v 1.0.3
- Update: Template SCSS files.
- Update: Contact page form.
- Fixed: Social media icon for team profile.
2023, 20 September - v 1.0.2
- Added: Home 5 Page.
- Fixed: Template minor bugs.
2020, August, 20 - v 1.0.1
- Added: Home 3 and 4 file.
- Added: RTL Version.
- Added: Free Quote Form PHP code.
- Updated: Template documentation.
Version : 1.0.0 - 14/02/2020
- Initial release